Tuesday, 10 June 2014

June Tag

Hello Everyone,

Just a very quick post here to show you my June tag entry, see Tim's original Here where he shows you exactly how to create the effect.
 
 I chose to use just three colours through the Dot Fade stencil for my tag, Peacock Feathers, Mustard Seed, and Picked Raspberry, but when this is spritzed with the water, the colours blend and it looks like I have used many more.
 
 
 As the Swifts are flying high as a kite in June, I thought it fitting to use this lovely bird from the Bird Feather Plate for my main image.  I also purchased the Random quotes plate with the intention of using the same sentiment that Tim has on the original, but as happens so many times when crafting, I changed my mind! same stamp plate different quote.  
 
 
 My cog started out one colour, before I decided to 'leave ordinary behind and use all three colours this time using distress paint.  I found the numbers brad just the right size for this cog, and then the cog sort of developed into a sun with little dots of paint making the sun rays. 
 
 
 The ribbon was dyed scrunched and tied with the same technique as described by Tim.
 
 
 I distressed the edges of the coloured card with black soot before attaching it to a tag and going around all the edges of the tag with Gathered Twigs.
 
 
Believe it or not I did use all three colours again on the bird, but with the water they are so subtle its difficult to pick out the Raspberry, I quite like it soft though as it does not lose the detail. 


Here is my little atc for June, same techniques but this time using the Classics 17 Plate and the Lattice work stencil


 And Finally a nosey at my atc hanger so far half way there already!  
 
 
Hope you enjoyed your visit, please do leave a comment, they mean so much
Bye Bye for now
Mo x

Thursday, 5 June 2014

Lighted Tea Roses

Hi Everyone,

The new Compendium of Curiosities Challenge has us turning to page 65 of Tim's book 3 and making Tea Roses. To see all the details on how to join in with the challenge, CLICK HERE.  The challenge is sponsored by the Inspiration Emporium this time, so you will have a chance of winning a Gift Certificate to spend there, also, Tim & Mario have very kindly donated goodies for an extra prize, so you have two chances of winning.   Now, as ever with the Compendium Challenge I am not allowed to give away the how to steps (you have to buy the book for that which you can HERE ) but here is my entry for the challenge plus the how to's I can show you.

 
I decided I wanted to make something a little different, and was inspired by some of the lovely little table lanterns available at the moment for summer bbq's or weddings. The luminary die-cut had been lying around my desk for some time (well since Christmas actually) just awaiting some tlc.  I bought a little battery T light to go with it
 
 
 There were one or two area that I had not perfectly matched when putting it together and I wanted to keep the luminary white so.....
 
 
 I applied Wendy Vecchi studio 490 White embossing paste to the whole of the outside which covered the gaps in the corners and gave a lovely stone look.
 
 
 I die-cut, and coloured some spring greenery, I used Peeled paint and stain on different leaves to get a slightly different finish.


 then used a pokey tool to get some detail on the leaves.
 
 
 I used Vintage Photo DI onto the edges of the leaves and also very lightly onto the dried texture paste on the lantern.  The longer Spring Greenery was glued to the four corners.
 
 
 A couple of coats of Brushed Pewter Distress Paint was applied to the small inner platform and the roof and then a small ring pull was added to the centre.  This is only for decoration in this case, but it does give the option of allowing the luminare to be hung with a chain or ribbon.
 
 
I coloured some Vintage ribbon with a mix of Aged Mahogany, Scattered Straw, and Victorian Velvet Distress stains/inks spritzed with water on the craft mat.
 
 
 The ribbon was secured on one corner with a glue gun, and then twisted and glued to the next corner until it it all the way around the base.
 
 
 I got to this point and realised I had not painted the inside! so I very carefully used a paint brush and Brushed Pewter distress paint all over the inside.  (of course this step is easier before the roof is on!).
 
 
 Back on track! I made 6 roses initially for the project not knowing really how many I would use. Here is a clue as to the colours I used.
 

 I glued four of the roses back to back around the flame of the tea light.  I made a small hole in one more rose and glued this on the top, the tip of the flame was secured in the hole.
 
 
Finally the scored rose leaves were added in-between the roses I opted not to add acetate window panes and instead have the rose leaves free so they would hang out of the window apertures.
I made three more roses for the corners of the base to complete.
 
 
Enjoy a few more photos from different angles


Oh! one more thing... the little night light.... yes, it still works even though the roses surround it.
 
 
Thank you as ever for your visit today
Mo x

Friday, 30 May 2014

Happy Summer Garden Tag

Hi Everyone,

Firstly Thank you so much for popping over today for a visit to my crafty world, and welcome to my new followers great to have you with me.
Today I have my May tag for you. You can find Tim's tag HERE with all the step by step instructions. The first thought that came in to my head was, oh this is going to be easy this month,  How wrong was I.  So many decisions, which trinkets, what colour background etc. Here is my tag.
I chose yellow tone as my background as we are heading toward summer and this is a nice bright summer colour which makes me feel Happy. The yellow background is a mix of Squeezed Lemonade and Scattered  Straw, and then we have Mustard seed inked through the Latticework stencil.  All the tiles are made from chipboard and are decorated with the wallflower papers. 
 My Inspiration came from my garden where we have just had two beautiful fledgling blackbirds came to say Hello with their proud parents whom we have been feeding for the past few weeks.
The blackbird on my tag is made from shrink plastic die-cut from Tim's Caged Bird die and painted with acrylics.  He was just the right size to sit in the ornate frame.  He did not show up too well against the wallflower paper on the tile and so I gave him a burlap background which seemed to do the trick.     
 Also in the garden last week we noticed the swallows flying high above us.  I just love to watch them swooping down to catch the flies they are amazing acrobats.  It is so nice to say Hello to them when they arrive from abroad every year, I feel so sad when they migrate back to warmer climates.  This little swallow is a remnant rub from the Botanical collection.  The little heart I have to own up is not one of Tim's but is very similar and I discovered it at the bottom of my trinket stash.  I put a flower in it and filled it with glossy accents to capture its beauty forever.  I love the colour of the flowers in my garden, and it seems every day I discover a new bloom.
 
I used one of the shadow press plates to spell my Hello, the arrow points inwards to the tag towards the pen nib one of my favourite of Tim's trinkets, and, which also enables us to say Hello in another way of course by means of words, letters, or in this case notes.
Those who follow my blog know of course that I am doing a little atc to match each months tag for my wall hanging, and here it is.  My atc has taken on more of an industrial feel although I have kept the yellow background to keep it bright. I have put a few small watch parts in the bottle, The pretty frame is an old broken belt buckle but acts as a lovely frame.  The tile on the bottom looks a little bit like a camera, this was not intentional it was just a scrap left over from my metal box which you can find HERE if you missed it. With the addition of a cog and remnant rub. 
 As you can see here the collection is building up nicely. 
Thank you once again for dropping in, and all your lovely comments I really appreciate them.
Mo xx

Wednesday, 28 May 2014

Bursting Flower Box

Hi Everyone,

Today I am sharing with you a project I have put together for Eileen Hulls Art with Heart Challenge? where the theme this month is 'May Flowers'.  I was inspired to do this  after seeing the one my lovely friend Anne made recently for her Guest Design spot over at Country View Crafts if you missed her AMAZING creation, you can find it HERE.  
I wanted to try and get a box bursting with flowers, but through the sides rather than the top, and here is how it turned out.
 I got my colour palette by just looking out of the window and I had plenty of purples flowering away in the garden. This is how I made it
 Use Eileen's large bigz block cube die (the 3" one) to die cut the block sides from strong board, I used mount board. I used a movers & shapers flower to die cut die cut the apertures, and then painted with Bundled  sage DP and stamped using Coffee Archival.
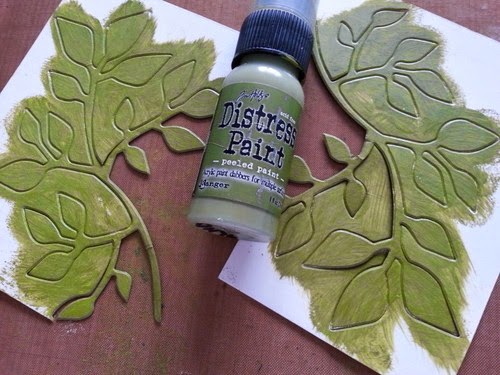
 I die cut leaves from the bigz spring greens and coloured with Peeled Paint DP
 Used a poky tool to carefully score some detail onto the leaves
 and then shaped the leaves
 these were added to the built box around the flower apertures
 I took the flower cut outs from the apertures to make a handle for the top
 Glued them together and painted them using Dusty Concorde distress stain and a paint brush to get into the tight corners I used a drill to get a hole in the middle of the flower
 The hole was made large enough to take a book screw which was painted on the top with Mustard Seed.  The flower had a very thin coat of glossy accents and this was heat dried straight away which made it bubble and gave it lovey raised detail.
The book screw was pushed through the flower and secured to the top of the box 
with the other half of the screw under the lid (the inside of the box is brown as that was the colour on the other side of the mount board) the centre of the flower was speckled with a black archival pen
 
 The flowers were cut from mini tattered florals decorative strip from different coloured card and white card that was painted, these were layered and shaped
 I used 3d pads and acetate strips to mount the largest flowers
 and then secured then with another 3d pad onto the inside of the box through the aperture
 I continued to add different flowers, some directly onto the box and some on acetate strips
 until I had a spray bursting through on all four sides.  The little feet are just 4 square beads glued to the bottom
and that was the atb bursting with flowers 
 
 Thank you so much for your visit today
Hugs
Mo x


Friday, 23 May 2014

All about him

Hi Everyone

Thank you so much for dropping by today. I have some very exciting news for you.
I am delighted to have been asked to be guest designer over at A Vintage Journey where the lovely Anne is hosting this months challenge All about Him. Below is a little teaser of my project, if you would like to see more simply pop over to A Vintage Journey where you can see the project in full with plenty more photos.


There is still a whole week to take part in this challenge and there is a £10 voucher up for grabs to spend at Country View Crafts. Check out the travelling instructions Here.
Mo x