Monday, 28 March 2016

Industrial 'Spring' Butterfly

Hello Everyone,

I do hope you have all had a good Easter whatever you were doing.  I made the most of the gorgeous weather on Good Friday with a lovely long walk along the coast with a picnic lunch.  The rest of the weekend was spent catching up with with friends and neighbours.

I have for you today an 8" x 8" wall hanging I have put together for the latest Challenge over at Country View Crafts which has an Industrial theme Click Here for details.  Now I get a bit stuck with Industrial sometimes and looking back at my past projects they all seem to be silver metal with  black paint, so wanting to get away from this and add a little bit of Colour to the project I came up with this little number.

 
Now you see where the Spring or Springs come into the title!
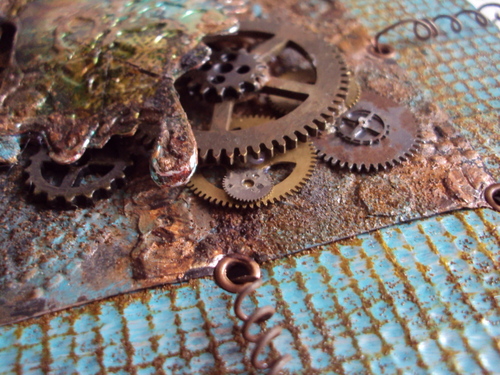
I started with 2 pieces of card which I covered in foil tape.  One I ran through the big shot with the gears embossing folder and the other I cut with the layered butterfly. Th butterfly was coloured using a mix of various alcohol inks followed by distress paints.  The gears were painted with distress paints and rusted with vintage photo distress embossing powder. 


I cut a piece of mount board and glued some pieces of foam hessian (like the stuff you get to stop things slipping on a shiny surface) around the edges.  I took some more metal tape and put this over the top and around the edges.  I then used a pencil rubber to get the pattern through the metal.


I used Peacock feathers distress paint over the metal, let it dry a little then rubbed it back to reveal the silver underneath.  I decided I wanted a darker look so I rubbed saddle brown stayzon over the top


I attached my centre panel with glue and punched holes when dry punched holes around the edges followed by copper eyelets.  I  took some rusty wire and threaded it through the holes, wrapping it around my pokey tool as I went for the springs on the front, but keeping it straight on the back (this was tidied up at a later stage!).


For the body of the butterfly I used clock parts and wrapped some rusty wire around to match in with the springs. His head and antennae are old watch parts


I have used various cogs for the layering, some are genuine metal watch parts, some are Tim Holtz cogs and I also used a few wooden cogs which I painted.


 The rusty hinges were left over from my 'Secret Garden'  Click Here if you missed it, when I decided they were too big, but I think they look good on this project.   


Well that's all folks! - for today at least
Thank you as always for dropping by today and if you would like to join in with the Industrial Challenge at CVC, you still have a couple more days click HERE for the details.
 
Mo xx 


Thursday, 17 March 2016

The Secret Garden

Hello Everyone,

It is a bit nippy over here in the East of England but I know many of you more central and west are having some well earned sunshine and Spring like weather this week so enjoy. 

Over at A Vintage Journey they have a new way of doing things which is really exciting.  For a while now every month the wonderful design team have been given a travel bag of goodies to use and have shown us some brilliant inspiration using just a few items.  Now everyone can join in with the AVJ March Challenge, so I thought I would give it a go.  The items we have in our travel bags are Board, Rust effects, Metal and Pale Purple or Lilac colours.  Inspired by a film I  remember watching many years ago, I have created a secret door which reveals a little Secret Garden for you.


 I started by cutting mount board with the cabinet die, I cut 5 solid and 3 with an aperture

Next I glued the three apertures onto a solid diecut for the garden, and glued the other 4 solid ones together for the door.  I cut the door in half.
Next was to paint the mount board, first I painted the mount board with gesso and let it dry.  I wanted a wood grain look so I used light strokes of Shaded Lilac Paint, then repeated once dried with Dusty Concorde.  
  

Although the Challenge needed primarily Lilac colours, I felt I needed to Grunge it up a little so I used Vintage Photo distress ink to do this.


I used an old Tim Holtz die 'Hardware Findings' to cut a couple of hinges, plus some real metal hinges, lock and key brads and ring pulls.  I rusted them all up with Vintage Photo distress embossing powder
This is the point where things were not quite going to plan! as you can see from the photo, when I put the hinges into place they were far to big.

So I used some shrink plastic to cut 4 new hinges, shrunk them down, and rusted them up.  I was much happier with this result, but felt the wooden door needed to be a bit more realistic.


 I used my pokey tool to drag down the doors to make wood panels.

And then rubbed some Walnut stain paint into the grooves


I used the Spring Greenery decorative strip to cut some foliage and a small flower punch.  Painted the foliage with Forest Moss and Peeled Paint, Shaped them and decorated with seed beads. 
 

Enjoy the close ups, I love the rust effects.


Did you spot the key to the door hiding in the foliage at the bottom?

 The photo in the centre which gave us the main view was taken by myself at Trentham Gardens, near Stoke on Trent a few years ago.  I like the way the path takes you down the garden to the stone Statue. 

The little Butterflies were fussy cut from some left over Graphic 45 papers and my trusty new typewriter came in handy again here too, 


The Challenge runs until the end of the month so there is still plenty of time to join in and have a chance of winning a fabulous package of Andy Skinner products.  There are also three pinworthies selected by the creative guides who are invited to rejoin them as guest creative guides for a future challenge.  
For all the challenge details Click Here.

Thank you for your visit today.
Mo x


Wednesday, 9 March 2016

March Tag

Hello Everyone,

I could not believe my luck this month when Our master Tim unveiled his March Tag, I could have given him a great big hug (had he not been several hundred miles away!) why?, because I had just taken delivery of my new Distress Crayons and Mixed media2 dies so for once I had the main ingredients to get working on my tag straight away, CLICK HERE to see Mr Tim's tag with a step by step of the techniques.  Tim's technique remix from previous tags continues and this month it is Dimensional Die Cuts/Textures.  Here is my take.

The tag is made up of three layers, for once I have remembered to photograph the layers before I started colouring.
The distress crayons are lovely to use, they blend really easy and the colours stay vibrant.
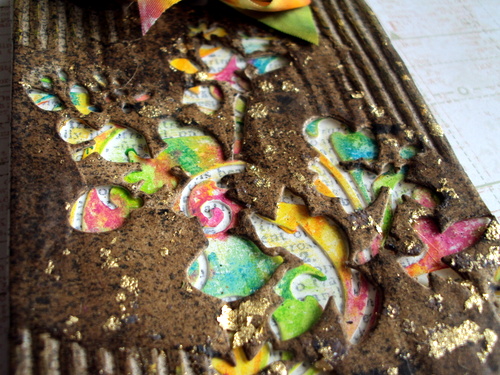
The gold pattern on the top corrugated layer came from the speckled stencil used with an embossing pad, sticky EP and gold foil sheet as Tim shows in his step by step.

I was really pleased the way this worked out, cutting both layers with the mixed media stencil individually meant that they did not quite match up and I love the way you can see all 3 layers.
  

The metal flower foliage was given a coat of Vintage Photo distress embossing powder to 'Rust them up and 2 small pieces of burlap were place behind it.  The flower disappeared into the background which I felt was a shame so I used the crayons and a little of the gold foil to bring it to life.


Originally I just had the Linen ribbon at the top of the tag, but wanted to bring out more of those beautiful colours. I dabbed 6 mini distress pads that matched the colours of the crayons onto a craft mat, spritzed with water and dipped the antique ribbon into it, really pleased with this bow.

 Here is my tag taken from another angle.

I really enjoyed re-visiting these techniques and giving them a twist with the new products, I feel like I am learning all over again, and we all love learning something new don't we??
Thank you as always for your visit today
Mo x 

Monday, 7 March 2016

Look and you will find

Hello Everyone,

Hope you are keeping warm as I know there is a lot of snow and cold winds around in some parts.

Today  I would like to show you a card I made for the latest  Indigo Blu challenge 'Red is the Colour', with a little bit of a fun element in mind.  The idea is for all Indigo blu fans to try and spot the different Indigo blu stamps used.  Some are obvious but others are more difficult as you may only have a snippet of a stamp in the set.

Before I tell you the answers, I will show you how I started to put this card together.  Firstly I cut a piece of copy paper and a piece of Perfect stamping card 14cm x 14 cm and cut an aperture out of the copy paper to make a frame to fit the card.

I used the frame to mask off the borders of the card and used Vermillion archival ink and the Bubbles background to stamp inside the centre.
 

I removed the frame and masked off the stamped bubbles with the cut out paper aperture, and used one of the 'Itsy Bitsy' Background stamps (a there is your first clue) to stamp around the border.

Next I cut out some of the bubbles and stamped these with various stamps before replacing them over blank bubbles of the same size.  For the cut outs I stamped onto card and glued them underneath.  The card was mounted onto red card and then onto a white base card.  The wording and arrows are created using rub ons.
  

So how did you do? lets have a look at some of the obvious stamps starting with the set I have already mentioned, 'Itsy Bitsy' backgrounds.  There are two here.... 

One here...
and one here.  You may also have spotted 'Square Peg Round Hole' which you can see on the large  bubble here...

The button was another easy one from 'In Stiches'


But did you spot the two small bubbles above with the dandelion clock on the right from 'Wild Meadow' and part of the thimble border on the left from 'Sewing mends the Soul'

Th bubble on the left of this photo is part of the large leaf from 'Bloomin Great' and the smaller bubble on the right is taken from the 'Map background'

On the picture below just below the Look you can see a glimpse of a sewing reel from 'Sewing mends the soul' and on the right a little more obvious, 'Rain Droplets'.  The pretty flower is taken from the hair of 'Juliet' it is not the large obvious one on this stamp but a smaller one  next to it.  Finally we have part of the tape measure from 'In Stitches' towards the bottom of the picture.


 A closer look from a different angle gives you an idea of the 3 dimension of the card.


I would like to thank Chris from Pearshaped Crafting for giving me the inspiration to have a bit of fun with a project with a wonderful page she created last week called where are the bears? see it Here.  I did not see any bears at first, but looking for them certainly made me look closer at the page. 
with your little challenge to find the stamps.
Thank you for dropping by, do let me know how many you spotted.

Mo x