Friday 17 June 2016

Seascape Guest Design for AVJ

Hi Everyone,

Very excited today to be bringing you my Guest Design piece for A Vintage Journey. Thank you so much to Nikki, Brenda and the team for asking me back again.

Their latest challenge is all about Embossing Paste and Texture and is hosted by the lovely Astrid  this is how she described the challenge.

Use any kind of texture paste (home made, crackle, coloured or plain) on your projects. There is an endless variety available, so play, have fun and apply it to your heart's content. Use it through stencils, randomly or in whatever way you want, but remember it should be in one of the vintage; shabby; mixed media; art journalling; industrial or steampunk styles that we favour. Put on your mixed media hat and create some magic!

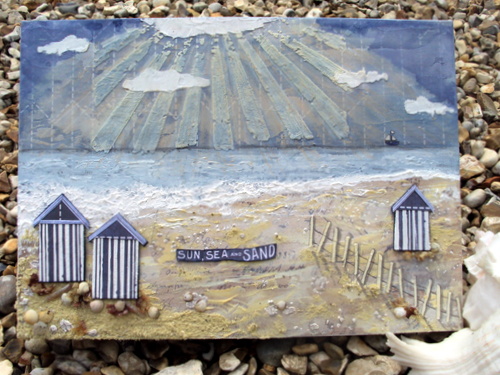
Well I love texture in my projects so I needed no encouragement to get out my various embossing pastes and play. I having been wanting to do a seascape canvas for a while now and this theme gave me the perfect opportunity to do this. 

 First I gathered together my Dapper paper pad, Canvas, stencils, various embossing pastes
Using two of the Dapper papers I made a very rough beach/sky background by gluing them onto the canvas
 
Next I knocked the colour back a little by dry brushing with white Gesso
 I scraped a few wispy clouds over the sky using white embossing paste 
and mixed some white embossing paste with a little antique linen paint to get a coloured paste and used this to get some texture on the beach again using a palette knife
 
I created a sun ray using the same coloured paste and the Rays stencil, using a stiff paint brush I then gently brushed the paste to get a softer effect. I  used a couple more stencils to create  a a fence and a rocky area 

  I changed over to a glossy white embossing paste next to create a few waves
mixing the glossy white paste with stormy sky paint, I dabbed in the sea so it filled the gap between the waves and the sun ray. I also went over the sides of my canvas with this paste  

A few more solid clouds were also added using the Matt  white embossing paste
 This next step involved mixing a realistic sand paste.  Tim Holtz showed us how to do this for his
July 14 tag using antique linen and black embossing powder, glossy accents and gold distress glitter.  The link of Tim showing you how is HERE.  I spread the paste over the sand area using a palette knife.  You will notice I have gone over some of my stencilled rocky area as I didn't like the effect.
 Making sure I went over the sides of my canvas 
 I painted in between the paste with distress paints that matched the top (antique linen, stormy sky, faded jeans) and blended them with white
 I wanted to create a horizon and blend in the sun rays down to the sea a little more so I used my antique linen and black distress crayons to do this
  I added a little boat on the horizon and toned down the yellow glare of the sun ray with a wash of stormy sky paint
 A change of paste again, this time I turned to my DecoArt crackle paste and speckles stencil 
 To add a few crackled seashells and pebbles on the beach 
I toned these down with a wash of pumice stone paint.  I also used the same paint to create shadows on the sand from the fence and drew the wire linking up the stakes of the fence with a pencil
Now all I need was a few beach huts and for this I turned to the remainder of the blue Dapper paper I had started with as the pattern on them was a beach hut shape.  I cut out 3 and used the stripes stencil and the glossy embossing paste to create the white stripes, small strips of the shirts on the reverse side made the roof edges.  To give the beach huts more depth I glued them on to mount board, cut them out and painted the white raw edges blue.
 
 I created the sentiment from the same paper cutting up existing wording and re-arranging the letters


I added a few real shells and seaweed, I picked these off my local beach the shells are tiny. A few more shadows were added to the beach huts but no doors on view because of course they too are looking towards the sea.  
Finally a few close ups to enjoy


 Thank you so much if you have taken the time to see this post to the end and I hope you enjoyed seeing how it all came together. 
Mo x


Monday 6 June 2016

June Tag

Hi Everyone,

Firstly I would like to thank each and every one of you for your lovely comments on my Stitch in Time project, I really do appreciate them.
This is a quick post this evening to show you my take on Tim's June Tag as I was determined to be one of the first instead of coming in last minute as I did last month.  For his technique remix this month Tim is using Tissue wrap collage and stencilled Plaid, his original along with his step by step can be viewed  Here 
As usual I did not have the dies, stamp nor the new distress medium, but as Tim likes us to experiment with products I am sure he won't mind that I adapted by mixing pool alcohol ink with glue and seal to wrinkle my tissue onto the tag
Tattered florals movers and shapers gave me my cut out flowers and the stamped stems came from the flower garden set
The colours used for the plaid were Picked Raspberry, Twisted Citron and Mermaid Lagoon.
I used some of the plaid to die-cut 2 buttons from the Bigz Sewing Room die and threaded them with black twine.
 I used a black micron pen to add the faux stitching around the flower petals


Plus I machine stitched around the edges, added beautiful world with rub ons and a matching piece of plaid  tied with a black bow
A view from a different angle
 
Thank you as always for your visit 
Mo x

Friday 3 June 2016

A stitch in Time Step by Step

Hi Everyone,

Firstly can I Thank everyone for your lovely comments on my stitch in time canvas, these are very much appreciated.  As promised I am back now with the step by step photos which show you how the elements were put together in a little more detail.  Here is a little reminder of the finished piece.
  so (or should that be sew) here we go. I gathered a collection of eclectic elements fabrics  and mount board plus the Bigz sewing room die
 Cut strips of fabric approx 1" wide and stitched them together then gathered them at one end.  The manikin was die cut from mount board plus I die cut the upper body part from a piece of linen.
 I was not sure how much of the manikin would be on show so I used walnut stain distress paint to cover the wooden parts followed by over-stamping with potting soil archival ink and a wood grain stamp.
 I sewed a strip of rose lace to the hem of the skirt (you may notice I have shortened the skirt a little too)
 Added a waist band
 and then wrapped some rose lace around the bodice to form the top of the dress to match the bottom
 Back out with the mount board to cut a window. I cut each of the four panes into four smaller pieces
 I wrapped strips of material around the smaller pieces to make mini material rolls.
I cut four extra windows so I could glue them together to make a desk.  You can see I have used different colours of mount board but as I was painting them this did not matter.  To make the desk shape from the window I have just cut off the bottom sill and the two vertical strips in the centre.  
The sewing desk was given the same treatment as the manikin with the paint and wood grain stamp. I glued the rolls of material together into two bundles of 8 and because the were from the original window panes the fitted perfect side by side on the table shelf. 
 More materials gathered, Tim Holtz dapper pad and Indigo blu stamp sets 'In Stitches' and 
'Sewing mends the soul'
 I cut four strips approx 4cm wide from a sheet of Dapper paper
 and glued each one around the edges over lapping slightly
 Another sheet of Dapper paper was cut to the size of the canvas, machine stitched around the edges. I distressed  the edges with a distressing tool plus rolled them in a little more to reveal more of the paper underneath. Finally I stamped in the corners with the sewing pattern stamp from the 'In Stitches' stamp set using Potting soil archival
 The sewing machine is from the 'sewing mends the soul set and was stamped onto matching paper with Jet black archival and embossed with black embossing powder.  I fussy cut around the machine and made a little slit near where the needle is so I could slide a small piece of stitched material under it.  I part wish I had cut the centre of the machine out but was worried it would make it to unstable to hold the material.
 I gathered up a few of my scraps where I had been testing different machine stitches and placed them under the dress so you could see it better against the background.  In the finished piece you may notice I place a darker piece of burlap under the top so it stood out better.
I collected a few of the tiny scraps up from my desk and glued them to the bottom of the sewing table, after all we all have scraps on the floor when we are crafting don't we??
For more photos of the finished canvas click Here to visit my last post.
Thank you as always for your visit today, I hope you have enjoyed .
Mo x


Thursday 2 June 2016

A stitch in Time

Hi Everyone,
 
I kid you not as I am writing this post I notice I have a whole 37 minutes to get it live and linked up to the challenge it was intended for!!!! Yes I am getting worse at cutting it fine. With this in mind, I do have make up photo's for you but I will show you on my next post.  
 
This is an entry for the  'Sew Special' challenge at A Vintage Journey which this month is hosted by the very talented Jenny. who in her own words says Add fabric to your entry in some way be it felt, burlap, ribbon or cloth and if you're really feeling brave maybe include a touch of real or faux stitching! 

I wanted to use some of the eclectic elements fabrics that I have been holding on to for a while now so I made a sewing desk from the Bigz window and window box set and wrapped material around parts of the cut out windows


Here you can see them a little closer and you can see the dimension
 
 
A few scraps gather around the base of the table


Someone has been very busy creating this lovely dress for a very lucky lady just awaiting to be collected from its manikin

 
Here again from a different angle


From this angle you can see the dimension of both


Hope you like it, don't forget to pop back tomorrow for the make up photo's
Mo x