Thursday 28 February 2013

Which little bird told me?

Hello Again,

Just as a follow up to my desk, I thought you might like to see the finished birthday card. It says which little bird told me because it is for a lady (Sandra) who meets up with 3 other ladies for coffee and one of them let the cat out of the bag about it being her birthday.  I thought it would be a bit of fun to have the 3 lovely little claire owls representing them with a very guilty looking one in the centre but whoo was it?. 
I made a mask from a die-cut waste and inked on both sides of it to create a frame with seedless preserve, ripe persimmon, and mustard seed distress inks. I then overstamped in the same colours with Indigo blu script stamp in the centre and their crackle stamp on the outsides.  I then used another Indigo blu stamp (vintage flourish) and stamped with black archival once with the frame in place and masked off in the centre and again after theframe had been removed.  I used the rubber on the end of a pencil, and the same colours used earlier to dot inside the frame the used the pencil end to do the tiny dots.  An archival pen was used to bring the dots out a bit more.  The Happy Birthday ticket stamp was a freebie I got in a magazine a while ago and the branches and leaves were cut using punches and dies.  The metal flower was one of a few I made up a few weeks ago (see older post) upcycled from an aluminium drinks can, embossed and coloured using alhohol inks.  The wording was done on my computer, then printed off on to self adhesive canvas.  It took a couple of trys and I found that I needed to attach it to a piece of normal printer paper to help it through, but it worked quite well.    
BBFN Hugs Mo x

Wednesday 27 February 2013

WOYWW 195 Tale of 2 desks

 Hi everyone, Fistly I want to Thank all of you who have visited my little blog in the last week and left such lovely comments, I really do appreciate them and read them all, they mean such a lot to me.
Well, Its Wednesday again time for a snoop around the crafty desks of the world and see what everyone else is up too. Visit our host Julia and see how to join in the this very addictive weekly bit of fun. 
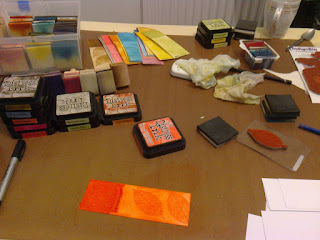
 I am busy with my workshops today so I took this photo last night.  I am making a birthday card for a friend (ITS NOW FINISHED SEE MY NEXT POST FOR A SNOOP)initially using a technique through the aperture from a die cut shape as shown in Craft Stamper (you can see this at the back of the desk).  I started off ok, then I got a bit carried away and ended up filling the card not just the aperture! There are 2 Indigo blu Rubber stamps I used on the card and a bag full of promarkers that are awaiting filing.  The die on the bottom is one of my new purchases and has been used to cut out the shape next to the wet wipes which is really pretty and I am going to use on another card, the die  just peeking out above the left hand distress pad is the one I have used for the card, you can see the frame (mask) on top of the promarkers which is quite nice on its own. Under the Craft Stamper you can see my workshop reminder file which is a photo album of future workshop projects so I have a reference of what I used when I come to prep them.  The red book under the frame is my step by step notes which brings me on to......
Desk number 2 -  my dining room table on Tuesday night.  I had been frantically prepping for my workshop yesterday before I started the birthday card and the elements are all laid out ready to be bagged .    Lots and lots of die-cutting and lacy bits,buttons,ribbons,flowers stamping embossing and distressing. The ladies are going to be very busy playing with all these elements whilst they make up their cards which when finished will hopefully look like these ones. 
For those eagle eyed amongst you their is one small detail missing on a sewing theme card, scissors, but there is a little gold di-cut pair that is to be added.  The card sample above however was taken before I bought the die and was up on display in the shop so I could not add it on for the photo.  Ok I will have to fly now and get on with my busy day, but I will be back later and I will try to visit as many desks as I can. Have a great day, Happy WOWW. Hugs Mo x  

Friday 22 February 2013

Thankyou,Thankyou!

Hello everyone,
I just wanted to say a huge Thank you to Heather Algera and Buttons for both nominating me for the Liebster award following Jill, I have asked them to pass the award on but please ask you visit their lovely blogs Here for Buttons and Here for Heather as they are both very talanted ladies and well worth a look. I just cannot put into words how honoured I am that you all think me worthy of this award.
Hugs
Mo x

Thursday 21 February 2013

Hello Everyone,
 
This week has been full of surprises, and non more than my nomination by Gill gibbyfrogettcraftations.blogspot.com for the Liebster award Thank you my friend I am honoured, I have never won anything before so this is a first for me.


ABOUT THE AWARD
This award was designed to be a blog award in the pay it forward fashion. Once you've been nominated, you award it to five blogs that you like that have fewer than 200 followers, to encourage new visitors to visit these blogs.

 
RULES FOR ACCEPTANCE

Thank the person who gave you the award and link back to their blog. Post the award onto your blog. Give the award to five bloggers who you appreciate that have fewer than 200 followers. Leave a comment on their blog letting them know that you have given them this awesome award!


PAY IT FORWARD
Here are five awesome blogs that I think you should check out:
Sandra De
Lori
Toni
Kay
Mary H


Wednesday 20 February 2013

Buzzy Bee's

Hi Everyone,
Just popped on to show you my finished Buzzy Bee Clock. First I gave the clock 2 coats of gesso and used texture paste through the honeycomb stencil.  Once dried I used mustard seed, wild honey and spiced marmalade Distress inks lightly over the top to colour.  I used 1 coat of black acrylic all over the rest of the clock to make the honeycomb pop out.  The numbers were honeycomb shapes cut out of grunge paper and coloured with Mustard seed and wild honey, I stamped numbers with Black archival and edged with black archival pen and white opaque pen to add interest.  The Buzzy Bees were stamped onto tissue paper and glued onto the honeycombe.  The whole clock was then given a coat of mod podge to seal it (except the bees wings).


 I am quite pleased with the finished result, so please in fact I decided to do a heart below along the same lines.


They both gave me a buzz! - sorry it had to be said.
Hugs Mo x   
.

WOYWW 194

Hi Everyone,
Firstly can I say a big hello to my new followers, Thank you for joining me on my crafty journey.  My desk today has not moved on too much from last week and still sees me playing with home made texture paste (Yes I found the recipe) to the top left you can see more wooden hearts lovingly cut out by DH in various stages of texture and decorating. Down from these we have 2 alphabet/numerical stamp sets I am using on my tick tocks. At the front are 2 flutterbys these are a test run for the for the next clock (the one drying at the back right behind the pot of texture paste) You cant quite see the pattern of the texture on that one, it is flowery.  I have a couple of numbers at the front, two were stamped wrong and the number 7 is getting a border of archival pen.  The distress pads really should have been cleared off the desk as I am done with them, but you know how it is you just carry on until you run out of desk space.  You can just see behind the DP's a clue to where I am heading with this current clock - Buzzy Bees. (UPDATE: I have just posted the finished clock see newer post for a nosey). 
Ok that's all for now, I will try to catch up with as many other desks as I can, I love to see what everyone else is up to.  Join in the fun with our host Julia at stamping-ground.blogspot.com
BBFN Mo x

Saturday 16 February 2013

Little Bird Heart Hanger

Hi Everyone,
Yet another very quick post just to show you a little lovebird hanger I have been working on today for a friend. 
The wooden hearts are made by my DH from MDF ready for me to decorate.  I gave it 2 coats of Gesso and 2 coats of white acrylic paint. I stamped and clear embossed the bird house (Hobby Art) and sentiment (Woodware) on the bottom and coloured it in with cosmic shimmer mica powders used as watercolours. The wooden heart at the top was backed with pink card to compliment the hearts on the house.  I twisted gold craft wire around my pokey tool adding small pearl beads as I went and finished it off   with ribbon.  I am entering this into the Share the Love Challenge by Anything but a Card.
Hugs Mo x


Wednesday 13 February 2013

Bloomin Great!

Hello Everyone,
Just a very very quick post to let you see some of the work my lovely ladies did on a workshop last Wednesday using the Indingo Blu Bloomin Great Stamp set.  I gave them the idea of the card and they picked the colours, how different are they? - Bloomin Great! - well done ladies.
Hugs Mo x

Tags of 2013 February

Hello Everyone, just a very quick post to show you my Tag for February.  I did not have the queen of hearts stamp so I hand copied it with a pencil onto card and went over this with a pen so it looked a bit like a stamp! (I think) I then coloured it with DI s and went over the top of it with crackle glaze although it is not very clear in the photo.  The main tag was dry embossed with a 3d heart emboss folder and distressed with Spun Sugar, Festive Berries and  Aged Mahogany and dabbed with a little Brushed Pewter stain here and there.  The edges were distressed and coloured with Aged Mahogany. The heart band on the top was metal tape over card and punched out with a small heart punch. It was  embossed with a tool, painted with black acrylic and then laid over the top of more metal tape so the hearts show through.  The black border is cut from vintage lace decorative strip. The Heart on the bottom was just a plain metal one I had in my stash and I used a red pro-marker to colour around the middle layer.  I hand wrote I heart you on it although again this is not very clear.  It is held on with bakers twine and behind that is a heart emboss (free with the old style cuttlebug) embossed on colorcore card from the whitewash collection and sanded back. The black card at the back is embossed, sanded   and dabbed again with a little Brushed Pewter.  The February arrow was taken from a dictionary.  It was finished with Tape,  paper covered wire twisted into spirals, and a queen from my dymo machine (hey that rhymes:)) Hope you like my efforts.
Hugs Mo x

WOYWW 193 Tick Tock Clock


Hello Everyone, I am late to the party today, I got up late and dashed out to do my weekly workshop at High Legh, and forgot to take a picture of my desk and post before I went out. If you dont know why I want to take a picture of my desk, hop over to Julias blog stamping-ground.blogspot.com  and learn how to join in the fun.
I am back in the house now fed watered and have tried my best to get some light on the matter as outside it is cold windy and this mornings snow is slowly being replaced by lots of icy rain so the sky is grey.

Any way enough of my excuses.  On my desk today we have  clocks new stamps and masks from my visit to the Event City Show in Manchester where I went with my lovely friend Anne bollyanne.blogspot.com.  We came back with lots of lovely goodies.  So you can see a couple mdf clocks in various stages of painting and the lovely new Indigo Blu stamp that I bought which is just perfect for decorating them. The picture on the left is the first clock I have finished, I played safe and just did basic black stamping with a crackle stamp onto a stone coloured background.  Its ok for a first effort but now I know how much space I have got under the clock hands, I am going a bit more adventurous with the next and trying some texture paste and embellishments.  I have seen somewhere on utube a formula for making your own texture paste, thus the bottle of talcum powder and pot of mod podge on the desk, but then I could not remember the formula, so It is sat waiting for me to get back on utube to continue.  The two new masks looking like they have just been perfectly placed on top are because I cant decide which one to use on this project.  You may just be able to spot a couple of the distress applicators that my lovely Al has made for me (one is an original) they work perfect, and he has just passed me a bag of 20 so I wont have to keep chopping and changing them. 
Anyway that all folks time to catch up on my run around other desks now cu soon.
Hugs Mo x


Wednesday 6 February 2013

WOYWW 192

Hello everyone
I cant believe its Wednesday again where has that last week gone to?
My desk this morning shows I am on a mission with my distress inks.  I have been meaning to make myself a colour chart for them for ages, and as you can see I am well on my way with it.   I now have 47 of the 48 colours so it seemed like a good time to sort the colour chart out.  I am hoping to get the last one seedless preserve this week, to complete the set . This has taken me a number of years to collect, but I do love them.    Big Al is in the process of making me some wooden applicators to use with them as I only have a couple of these and I do prefer using the applicators rather than the cut and dry foam cut down in to squares.   If you are wondering how I got on with the flowers from drinks cans or the butterflies I had on my desk last week, see my previous post. 
Right I am off now to have a look as to what everyone else is up to if you are not joining in the fun yet pop along to stamping-ground.blogspot.com and our lovely host Julia to find out how.
Hugs Mo x

Monday 4 February 2013

Aluminium Flowers & Monochrome Cards


Hello everyone,
 Some of you were asking about my desk full of butterflies last week, so here are a couple of piccies to show you the cards the ladies were making on the workshop the theme as you have probably guessed was monochrome. 


Monochrome Butterfly Card


 and here they are hard at work
 
 
Monochrome Easel Card
 also this is what the aluminium cans that I was upcycling turned out like. I have not made up my mind where I am using them yet so they are on the back burner for now.

.
2 where embossed and inked 2 were just inked and stamped and with the back 2 I just used their original colours. 
Can you guess which cans I used?

Just want to say a big THANK YOU to everyone who left such lovely comments on my post last week, I really do appreciate them all. 
Hugs Mo x